Thursday, June 23, 2011

How to : Butterfly and Grill a Whole Chicken (not for the faint of heart)

Grilling a whole chicken is a fun alternative to oven roasting.  Here I will show you step-by-step how to butterfly the chicken and grill it to crispy and moist perfection.  Warning: the following pictures are of me butchering a whole chicken...if that grosses you out, skip this post :)

1.)  After rinsing the chicken under cool water, pat it dry, lay it breast-side down, and - with a very sharp knife or good kitchen shears (shears would really be the best) - hold on to the neck and start cutting down one side of the backbone.

 2.) Cut down the other side of the backbone (yes, you will be cutting through little rib bones).  When you get close to the tail end, it will require a little more muscle.  Cut out the whole backbone.

 3.)  Lay the backbone aside and pull that chicken open.

3.)  Now you will remove the keel bone, or breast bone.  It is the long white bone (more like cartilage) running straight down the middle.  Make a small slice in the top of the bone, and run your knife down the sides to loosen it up.

4.) Run your fingers down the sides to wiggle it loose, and pull away.  It may take a little digging, but you should be able to pry it up without too much trouble (careful- it can break!)

5.) Here is the butterflied chicken with backbone and keel bone removed.

6.)  Time to season the pretty little chicken: I made a rub out of a few cloves of crushed garlic, cracked pepper, salt, lemon zest, and dried oregano.  Use whatever you like.

7.)  The rub goes under the skin to flavor the meat itself.  You should be able to easily pull the skin away from the breast meat and slide your hand inside to get the rub in there!  Access the thigh and leg meat from the outside, where my ring finger is in this picture (yeah...gross...I should have taken them off first).

8.)  Season the outside of your new friend with salt, pepper, olive oil, and a little more lemon zest if you like.


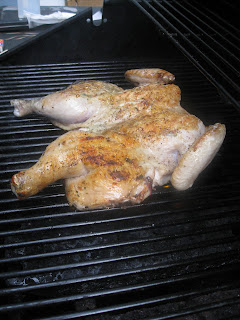
9.)  Set your grill on medium heat, and lay birdie skin-side down.  Now sprinkle the under-side with more salt and pepper.  Close her up, and cook for 15-20 minutes (watch for big flame-ups) or until she is nice and dark brown and crispy.

10.)  Flip!  Cook on the other side for another 15 minutes or so, until the thickest piece of meat reads 160 on a meat thermometer, or all juices run clear.

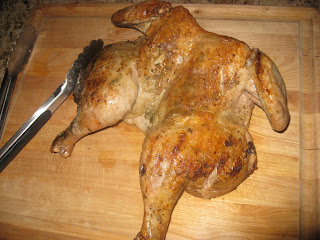
 11.)  Remove your beautiful grilled chicken to a carving board, and let it rest for about 10 minutes before carving.  This will keep a lot of the juices from running out.  Since you have de-boned it, the thighs and legs should pull away from the body easily, and the breasts and wings will come off together as well.

Have questions?  Post in the comments and I will get to them ASAP.  Enjoy!!

Wednesday, June 22, 2011

Recipes: Apple Bread - as promised

A yummy and fairly healthy recipe to use up that apple pulp from yesterday:


Ingredients:


  • 3 cups whole wheat flour


  • 1 1/2 teaspoons cinnamon


  • 1 teaspoon baking soda


  • 1 teaspoon salt


  • 1/4 teaspoon baking powder


  • 3 eggs


  • 1 1/2 cups sugar


  • 1 cup oil (canola or vegetable oil is fine, but olive oil will make it healthier)


  • 1 tablespoon vanilla


  • 2 cups apples pulp (I re-moistened mine with a little of the fresh apple juice)


  •  Directions:


  • Mix flour, cinnamon, baking soda, salt and baking powder together


  • In a separate bowl, mix eggs, sugar, oil, and vanilla


  • Add the dry ingredients


  • Stir in apple pulp (it's ok  if there are chunks of apple or skin- they will cook down)


  • Pour into a greased cake pan, loaf pan, or muffin tins


  • Bake at 350 degrees for 45 minutes (for a cake pan, shorter for muffins)


  • Tuesday, June 21, 2011

    Dust it off: Juicers

    I posted on my other blog a while back about my juicer.  I go through stages of using it all the time and then not using it at all.  This is a Jack LaLanne Power Juicer, and overall I have been very happy with it.  It is easy to use and easy to clean!


    The great thing about juicing is that when you buy a bag of organic apples that turn out to be too mushy for you and your picky apple eating husband, you turn them into a pitcher of fresh apple juice, and you turn their pulp into a batch of apple muffins (healthy, yummy, fiber-ful recipe coming soon).  When juicing, it is best to drink the juice within a few hours in order to get all the great nutrients out of it.

    Other things I like to juice: carrots, kale, spinach, apples, lemons, oranges, grapefruits...
    • Don't juice mushy fruits like bananas and avocados- it won't work
    • Do peel your citrus fruits before juicing them- the peel will go through, but it will make your juice taste bitter
    • Try a healthy juice blend of carrots, apples, kale, and spinach! It will be very dark green, but so sweet from the apples and carrots!

    So, if this is one of the kitchen gadgets that you never think to pull out of the box, let this be a little inspiration for you!
    •  I cored my apples with a melon scoop (If you don't plan to use the pulp and just want the juice, skip this step.  The juicer can handle a whole apple, peel and all.  I did not want seed and stem bits in my muffins.)

    • Turn on the juicer, and drop in a few apple halves (or a whole apple)...

    • And before you press down, remember to put a cup or bowl under the mouth! Otherwise your counter gets pretty messy...trust me (also be sure the pulp container is attached in the back...that is an even bigger mess)
    • When you're all done, you will have pulp in the container, and probably a lot stuck under the lid that you want to use, too!

    • The juice will be a nice dark brown color, like cider, and will probably have foam on top- no worries, just give it a stir.  Fresh juice is delicious!  I have covered and refrigerated my pulp for later, when I will make those muffins for you.

    Monday, June 20, 2011

    Recipes: Ginny Hendricks Cocktail

    This blog won't generally be about alcohol, but this one was too good not to share.

    While we were out of town, my husband treated himself to a few overpriced cocktails. One of them, the Ginny Hendricks, I begged him to order just because I saw someone else drinking it, and I decided that he had to try this tall glass of mystery, garnished with a slice of cucumber and a huge sprig of fresh rosemary, just so that I could smell it.  He loved it.  I loved smelling it.  If you like a gin and tonic, try spicing it up next time!


    Here is one recipe that I have found for it; slightly altered to match what we ordered:

    2 oz Hendricks Gin
    4 oz Tonic
    juice of half a lime
    4 slices of cucumber (pureed or muddled in the bottom of the glass)
    1 sprig fresh rosemary (used as a garnish and to stir, or muddled in the bottom)


    Disclaimer: Since I am pregnant, I can't test this recipe!  I just know that it is the same ingredients as the one that my husband had.  I will have him test it out soon :) I'm sure he won't object.